In most development processes hiccups are unavoidable. Our grasping application using the Niryo One arm was no exception. During testing, we had two of our arms break down and with this post, we would like to share our experiences with debugging and resolving these issues.
As far as we can understand, the axis 6 motor (Dynamixel XL-320 model) in the first arm, which is responsible for turning the gripper around, was damaged due to the gripper hitting the table. Since the gripper does not have an applied force feedback shutdown procedure, one of the motors probably broke down from overloading. Note that there is no gripper URDF model provided and octomap integration into the project was not yet complete at the time, so the kinematics planner was not aware of the table’s existence. As for our second arm, the culprit was the power adapter. The Dynamixel XL-430 motors are rated for 11.1 Volts, but the adapter supplied is a 12V one, which can cause permanent damage due to overheating if the arm is operating for prolonged periods of time. This design oversight was amended in Niryo One models shipped after November 2018, but in any case, you should check the rating of the power adapter provided and request a replacement if needed.
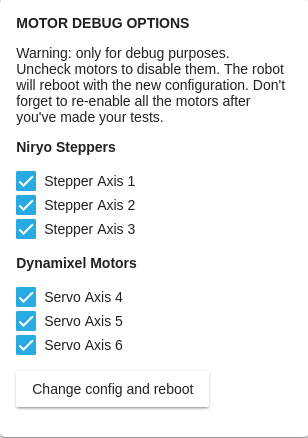
First things first, we need to figure out which motors are damaged. To do so we need to make sure a connection is established between our local machine and the Niryo arm. Now it’s a good time to pull the latest niryo_one_ros repository. After that, we launch the Niryo One Studio program, which is a user-friendly interface for controlling and debugging the arm. Clicking on the “Debug” tab on the left will bring up the “Motor debug options” panel. We uncheck all but one motor each time and click on “Change config and reboot”, which will reboot the arm with only the checked motor enabled. If no error messages comes up, then that motor is fine and we can move down the list. In our case, the axis 6 motor was identified as faulty. Finally, re-enable all the motors in the checklist and reboot one last time.
The next step is to replace the motor. Niryo provides assembly videos and by following those we can disassemble a particular joint of interest. Since we didn’t have a spare Dynamixel XL-320 in our disposal we removed one from the Gripper 2 provided with the robot. Every motor comes preconfigured with its own unique ID that signifies which part of the robot it actuates. These IDs are specified in the niryo_one_bringup/config/v2/niryo_one_motors.yaml file. As we can see the arm expects an ID = 6 but our replacement servo has ID = 12.

To alter the ID of the new gripper we’ll use the dxl_debug_tools program. First, we need to ssh to the robot and make sure the package has been compiled by running:
cd ~/catkin_ws
catkin_make -j2
cd ~/catkin_ws/devel/lib/niryo_one_debug
./dxl_debug_tools --help
Next, we have to bring down the Niryo ROS stack by executing in the terminal:
sudo systemctl stop niryo_one_ros.serviceNow we can run the program to set the grippers EEPROM values as necessary.
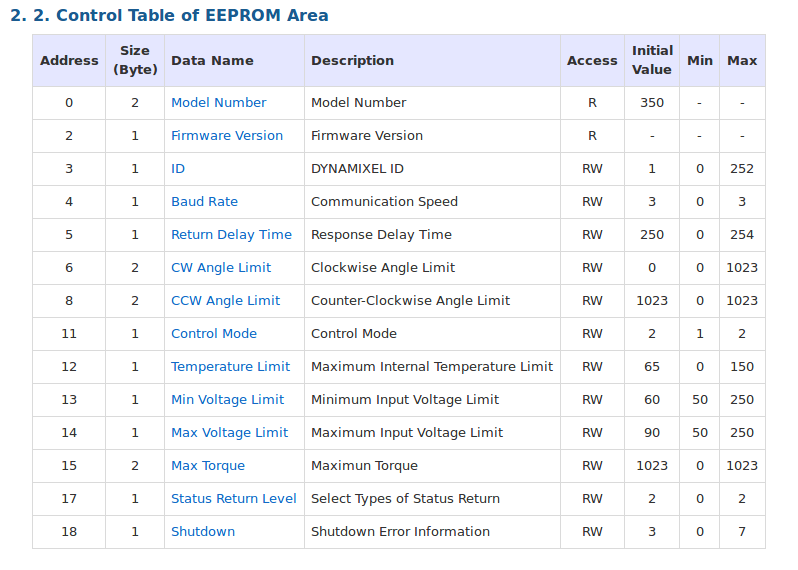
To change our ID from 12 to 6 we just have to run:
./dxl_debug_tools --id 12 --set-register 3 6 1We can now bring up the arm again by running roslaunch niryo_one_bringup rpi_setup.launch or just switching the robot off and then on. And now we are finally back in business and ready to run more tests!