This blog post describes the installation of OpenStack Grizzly with help of the Stackforge Puppet-Modules on CentOS 6.4 – with the use of network namespaces. The setup consists of a controller/network and a compute node. Of course additional compute nodes can later be added as needed.
Basic Setup
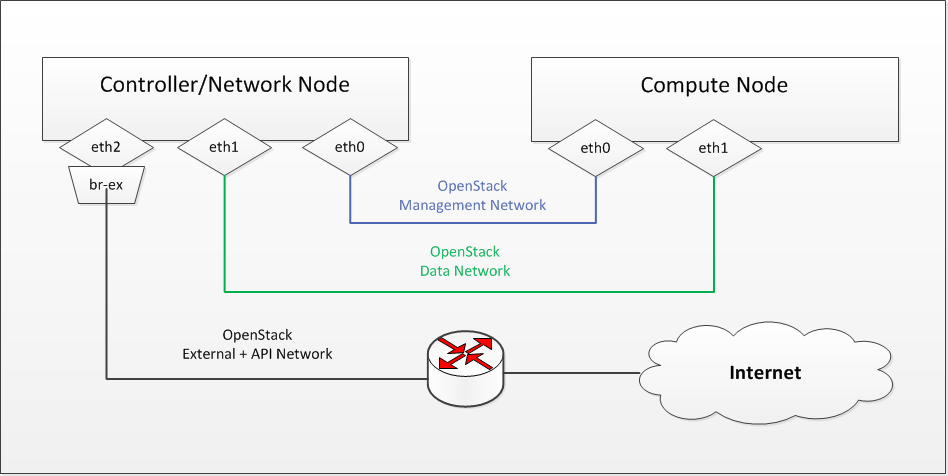
The installation was done with VirtualBox on a setup that more or less mirrors its real life counterpart (picture below). The operating system used on all the nodes is the “Basic Server” installation of CentOS 6.4. The controller/network node has three network interfaces. One will be attached to the management, one to the data and one to the external as well as the api network. When using those specific network names, I refer to them as they are described in the official OpenStack documentation (for example here). These names for the various networks can be confusing since sometimes other words are used to describe them. The description “internal network” is as far as I can tell sometimes used for the management or the combination of the management and data network. The compute node has just two network interfaces. One will be connected to the management, and one to the data network. At least for the installation the compute node will use the management/network node as a gateway to the internet, later this shouldn’t be needed anymore. The controller/network node is also the Puppet-Master while the compute nodes are Puppet-Agents.
Network specific problem
The problem and solution to it described in this section are specific to how I wanted the networks configured. If you have another setup and the network configuration set, you might want to skip directly to the next section (Installation of OpenStack).
The problem was, that before the installation of OpenStack with puppet, the NIC that would be connected to the external and api network was the only connection to the internet. This connection needed to stay available during the installation-process so necessary packages could be downloaded. The problem is now, that during the installation, “puppet” will attach this interface to the external bridge (br-ex) which would result in connectivity-loss. I worked around this by only manually adding the IP to the external/api interface and then adding some code to the puppet script which removes that IP address and assigns it to br-ex during the installation.
To achieve this, first configure the external/api interface like this.
DEVICE=ethX
BOOTPROTO=none
TYPE=ethernet
HWADDR=AA:BB:CC:DD:EE:FF
ONBOOT=yes
Add the IP address to that interface and set the gateway
# ip addr add xxx.xxx.xxx.xxx/xx dev ethX
# ip route add default via <addr of gateway>
Add the following snipped into the ovs.pp file – just after the quantum::plugins::ovs::port declaration. The file is can be found at /etc/puppet/modules/quantum/manifests/agents/. It can also be downloaded here
exec { "set br-ex":
    command => "ip addr del xxx.xxx.xxx.xxx/xx dev ethX; ip addr add xxx.xxx.xxx.xxx/xx dev br-ex;
    ip route add default via <addr of gateway>",
    path => [ "/sbin/" ],
    before => Service['quantum-plugin-ovs-service'],
require => quantum::plugins::ovs::port[$bridge_uplinks],
}
This solution does the job but can surely be improved. One of its flaws is that it only has to run once and further puppet-runs will display warnings. For the time being you could just comment that section out after the installation.
Installation of OpenStack
These installation steps apply to both the controller/network as well as the compute node. It will be noted where the procedure between them differs. The starting point is, as mentioned earlier, a freshly installed CentOS 6.4 “Basic Server”.
- Install Linux kernel with network namespace support
# yum install kernel-2.6.32-*.openstack.el6.x86_64
- Disable SELinux
# sed -i 's/SELINUX=enforcing/SELINUX=disabled/' /etc/sysconfig/selinux
This step might not be necessary. In a next step it would be interesting to get this whole setup working with SELinux enabled. Further information can be found here. After these two first steps, reboot the machine.
- Install RDO (Grizzly), Epel and Puppet Repositories
# yum install http://rdo.fedorapeople.org/openstack/openstack-grizzly/rdo-release-grizzly.rpm
# yum install http://download.fedoraproject.org/pub/epel/6/i386/epel-release-6-8.noarch.rpm
# rpm -ivh http://yum.puppetlabs.com/el/6/products/i386/puppetlabs-release-6-7.noarch.rpm
- Flush IPtables
# iptables -F
After a reboot, the rules defined in /etc/sysconfig/iptables will be active again. For that not to happen, just remove all the lines beginning with “-A” from that file.
- Enable IP forwarding
# sed -i 's/net.ipv4.ip_forward = 0/net.ipv4.ip_forward = 1/' /etc/sysctl.conf
# sysctl net.ipv4.ip_forward=1
- Update iproute and iputils package
# yum update iproute
# yum update iputils
This assures two things. Firstly the availability of the “ip netns” command (part of iproute pkg) and secondly to be able to issue arp requests from within network namespaces (which is fixed/patched in the newest iputils pkg). The second error would manifest itself with following error message: Stderr: ‘sysfs read broadcast value: No such file or directory’. This is a result of this bug
- Install Puppet
- For Controller/Network node
# yum install puppet-server
- For Compute node
# yum install puppet
- For Controller/Network node
- Download necessary Puppet modules (only on Controller/Network node)
# puppet module install puppetlabs/openstack
# puppet module install puppetlabs/lvm
# puppet module install puppetlabs/ntp
- Create/Edit ‘site.pp’ in /etc/puppet/manifests. You’ll have to update this file to suite your needs and fit your specific configuration. The file that I used can be downloaded here.
- Run puppet agent
# puppet agent --test
Before you can run that puppet command the puppet-master and the agents must be correctly configured/setup. If you should not be familiar with that, please refer to the documentation from puppetlabs.
One thing I had to adjust after the puppet-run was the novncproxy_host variable in the nova.conf file (in /etc/nova/) on the controller/network node, otherwise I couldn’t connect to the console via the dashboard. Just set the value of this variable to 0.0.0.0 and then restart the nova-consoleauth and the nova-novncproxy services.
Hi,
Can I ask, what type of adapters had you set up in your VM’s network settings in VirtualBox for this setup.
Im trying something similar for learning, but I think my virtual network hardware setup is wrong, Im having issues
Regards
Hi Bobby,
when I did this setup with VirtualBox, the network adapters for the controller and the compute node where set to ‘Host-only Adapter’.
I also created an additional VM that acts as a router and provides internet access. In this VM one adapter is in ‘NAT’ and the other in ‘Host-only Adapter’ mode. The ‘Host-only Adapter’ is on the External/API network and forwards traffic via the NAT adapter.
I hope this’ll help you. If you have any more questions, just let me know.
Regards Sandro
Hi Sandro, thank you for the prompt reply. I too have an additional vm to act as router and firewall, pfSense. I ideally I want my openstack system to sit behind this vm also. This is a college FYP, so Im trying to mimic a real life datacenter on a miniature scale !
Thanks for the info, so I might have gone wrong, I currently have my pfSense vm with 2 nics, bridged to my home router and intnet and internal network,
I had the openstack vm’s with a single nic, that was ‘intnet’ also, there is my problem I guess, they were able see each other and get out to the internet, but I was having some networking issues during openstack install, near the end of the document !!
I will try your way, thank you very much, I really appreciate your time 🙂