In the context of the ECRP Project, we need to orchestrate intercommunicating components and services running on robots and in the cloud. The communication of this components relies on several protocols including L7 as well as L4 protocols such as TCP and UDP.
One of the solutions we are testing as the base technology for the ECRP cloud platform is OpenShift. As a proof of concept, we wanted to test TCP connectivity to components deployed in our OpenShift 1.3 cluster. We chose to run two RabbitMQ instances and make them accessible from the Internet to act as TCP endpoints for incoming robot connections.
The concept of “route” in OpenShift has the purpose to enable connections from outside the cluster to services and containers. Unfortunately, the default router component in OpenShift only supports HTTP/HTTPS traffic, hence cannot natively support our intended use case. However, Openshift routing can be extended with so called “custom routers”.
This blog post will lead you through the process of creating and deploying a custom router supporting TCP traffic and SNI routing in OpenShift.
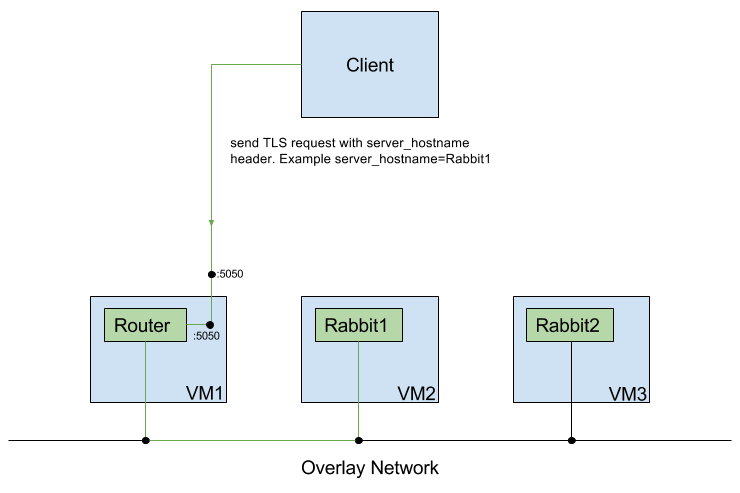
Before we get any further, a little explanation of SNI is due. SNI is an extension of the TLS standard, by which a client can pass a host name before the actual TLS handshake starts. The passed host name is then evaluated to select the correct service. Using this extension it is possible to serve multiple services with different domain names using a single IP address. It is the conceptual equivalent to HTTP name based virtual hosting.
Creation of a custom router config template
The default router in OpenShift is based on haproxy. The router can be configured and customized with a configuration template (written in the go templating language). As a starting point we used the default configuration template from the OpenShift router which can be found here: configuration template
We removed all the unused frontend and backend parts of the configuration and adapted only the parts which are necessary for routing TCP/SNI traffic.
The frontend part results in the snipped below:
frontend rabbit_lb

    bind *:5050 ssl no-sslv3 {{ if (len .DefaultCertificate) gt 0 }} \
    crt {{.DefaultCertificate}}{{ else }} \
    crt /var/lib/haproxy/conf/default_pub_keys.pem{{ end } \
    crt {{ $workingDir }}/certs

    mode tcp
    tcp-request inspect-delay 5s

{{ range $idx, $cfg := .State }}
{{       if and (ne $cfg.Host "") (eq $cfg.TLSTermination "edge")}}
    use_backend tcp_edge_{{$idx}} if { ssl_fc_sni -i {{$cfg.Host}} }
{{ end }}
{{ end }}

    default_backend  openshift_default
This snippet is configuring the haproxy to listen on port 5050 using TLS (“ssl” in config) and a set of certificates. For each Openshift “route” contained in a representation of the routing “state” with TLS termination policy at the “edge” (that is at the HaProxy itself), a directive to route requests (use_backend) is created.
The ssl_fc_sni expression extracts the SNI header from an incoming request, the header is then used for selecting the requested backend.
Our custom haproxy-config template can be found here: custom configuration template
A configmap is used to pass the finished configuration template to our router instance. To create a configmap the command bellow is used:
oc create configmap customrouter --from-file=haproxy-config-1.3.template
Server keys/certs
As a next step it is required to generate the keys/certs for RabbitMQ instances or a wildcard certificate for the whole domain range which then can be used directly from the custom router itself. In our test environment we created our own certificate authority to sign the created wildcard certificate. To generate keys/certs we provide two scripts which first generate a certification authority (CA) and then a certificate. These scripts can be found in our repository.
A wildcard cert is defined with a wildcard operator for the hostname in the domain name for example: *.testapp.apps.zhaw.ch.
Once the wildcard key/certificate is created it needs to be passed to the custom router. The provision is made using a tls secret.
It can be created using this command:
oc create secret tls NAME --cert=path/to/cert/file --key=path/to/key/file
This secret is then mounted as a volume to the router instance.
The used scripts can also create regular key/certs per host. To do so, just replace the asterisk with the desired hostname.
To use a key/cert per each host we have to add it when we are creating the route.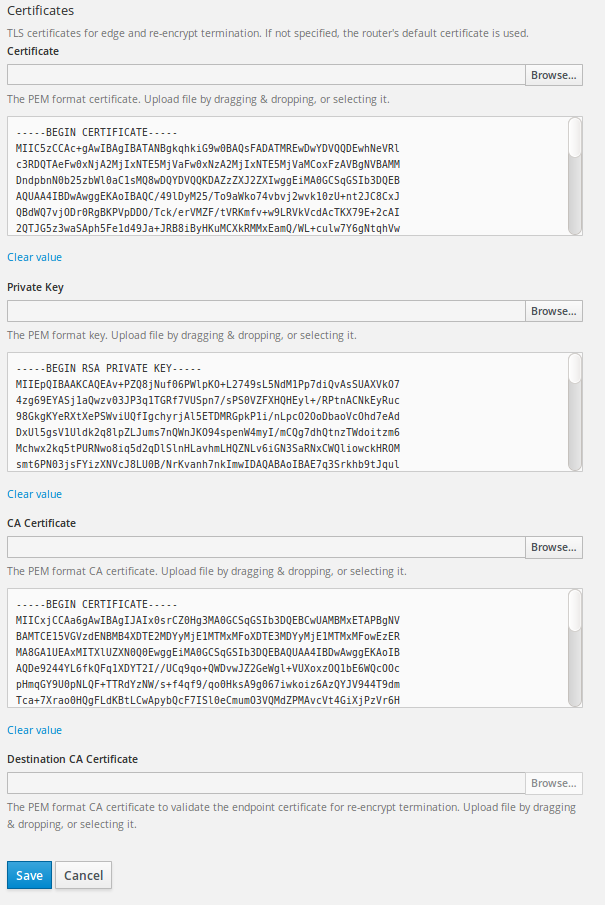
Router deployment
A next step we can deploy our customized router instance. To do so, we provide yaml templates for the deployment configuration and also the service which is used to connect the router to the host network. This templates can be modified to fit the requirements of the cluster.
oc create -f router_dc.yml
oc create -f router_dc_svc.yml
Open ports, final steps
Our customized router listens to traffic on port 5050, this can be changed in the yaml template and in the configuration template.
To let in traffic on port 5050 we need to open this port on infrastructure level and also inside the vm itself. In our case we had to edit the AWS security group and add a iptables rule to the vm.
sudo iptables -A OS_FIREWALL_ALLOW -i eth0 -m state --state NEW -p tcp --dport 5050 -j ACCEPT
If not already there the RabbitMQ instances should now be created. The templates are also provided in our repository.
Don’t forget to add the routes to this RabbitMQ instances. This needs also to be done when a wildcard certificate is used, to have an endpoint with TLS termination at the edge.
Testing the setup
There are a few things we can check to see if everything is working as expected.
- are the router pods up and running? oc get pods, to see the status of the pods
- if the router instances are running, exec into it and look at the generated configuration. oc exec -it POD_Name bash, then cat the haproxy.conf to see the generated configuration.
If all looks good, and the configuration was created properly, we can test the connection to our RabbitMQ instances using a small python script we created. This script sends a hello message to the desired RabbitMQ instance. To select the instance, the server_hostname parameter can be specified inside the script. This parameter is used to get to the right RabbitMQ instance based on SNI routing. The output of the script should look like this:
Connection established to: >
Sent: helloword, sent at 2017-03-29 08:21:41.332223
Hello Tobias,
Where can I find the router_dc.yml & router_dc_svc.yml files ?
I can’t find them on the github repo.
Thanks,
Romain
Hello Romain
You can find them on the bitbucket repository also linked in the text.
https://bitbucket.org/furbaz/haproxy_custom/src/e1b5d37a674f?at=master
Very informative blog. Thanks for sharing.
for more details you can visit here
https://www.youtube.com/results?search_query=OpenShift+custom+router+with+TCP%2FSNI+support
It looks effectively interesting. Thanks!
Which option would you recommend to combine this with another router for HTTP/Websocket:
– Add the config for port 5050 in the template of the existing router?
– Add a second router with additional floating IP?