In the GEYSER project, we are examining suitable Openstack architectures for our pilot deployments. In an earlier blog post we described different ways to architect an Openstack deployment mostly focusing on AZ (Availability Zone) and Cells (those were the only options available back in 2013). Much has changed since then and new concepts were added such as regions and host aggregates. Even though Cells have been available since Grizzly they are still considered experimental due to lack of maturity and instability. In this blog post we describe our experience enabling Cells in an experimental Openstack deployment.
Why Cells?
The documentation says that “Cells functionality enables you to scale an OpenStack Compute cloud in a more distributed fashion without having to use complicated technologies like database and message queue clustering. It supports very large deployments”. Although we don’t have a large deployment this is pretty much in line with our requirements for our pilot – a distributed system with a single public API exposed. Comparing with other architectural approaches currently available the one which gets closer to this design are regions, but even then is not desirable as it exposes a public API for each region.
Cells Architecture
Understanding Nova Cells architecture was somewhat tricky, as the documentation does not make it clear where each service should run and new concepts are introduced – the API Cell and the Compute Cell – which do not map obviously to the standard controller/compute node architectures. While there are a number of articles on getting started with Nova cells (listed below) the clearest picture of its design is presented in the prescriptive example of CERN architecture.
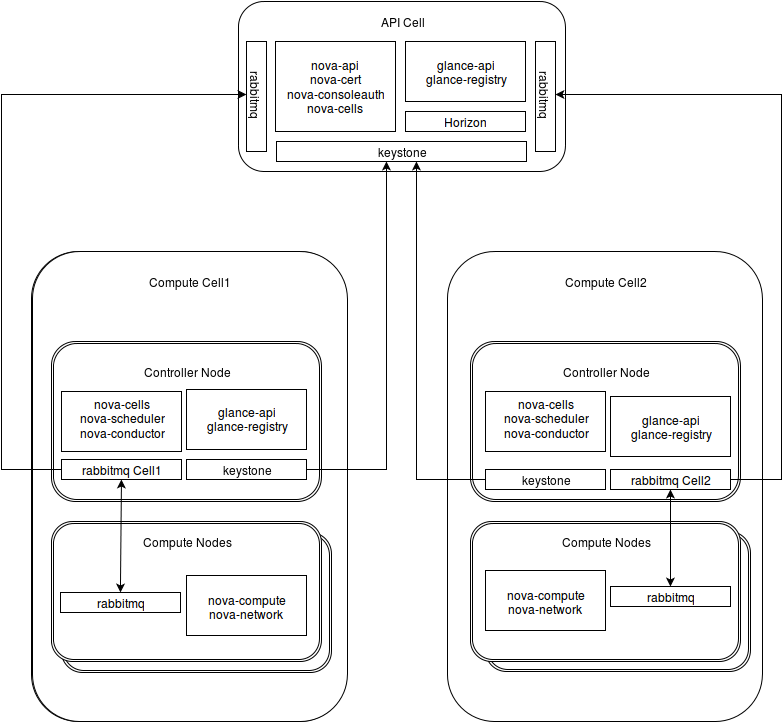
It is important to understand that the API Cell operates as a thin layer managing and redirecting queries to the right Compute Cell; it sits on top of each Compute Cell being the top-level cell of the hierarchical tree exposing a single public API to users.
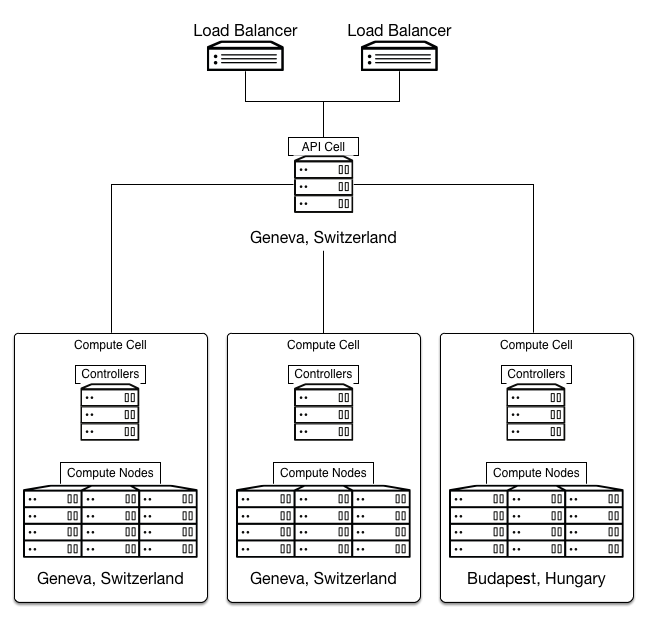
Compute Cells are very similar to a classical Openstack deployments comprised of controller and compute nodes and associated resource management. However, instead of running the nova-api service on every controller node a new service – nova-cells – is added which connects its nova-* services to the API Cell via a message bus. This is shown below (source).
Converting to Openstack Cells
For our experimentation we actually didn’t want to redeploy a full environment; we wanted to convert from a typical small controller/compute nodes configuration to a cell architecture – note that we have installed Juno version following the installation guide and all packages and services were installed from the main ubuntu repository. The instructions in this blog post provide a clear idea of what has to be done to convert a running Openstack deployment to use nova cells. Our biggest issue was to think that the controller node was supposed to be converted to the API cell, which was the source of some misunderstanding which resulted in reinstalling nova services of a controller node in a compute node(much more work). Rather than converting the controller to an API cell, it is simpler to get a new server and use it as API Cell, or take a compute node and change the installed Openstack services. The picture below illustrates key services running on both API and Compute cell and Controller and Compute nodes. We haven’t worked with other services as yet like ceilometer, neutron and cinder and hence these are not shown (for networking, we used nova-network in each of the cells).
Configuring the API Cell
To configure the API call, we had to add the following lines to /etc/nova/nova.conf:
[default]
rabbit_host=api_rabbit_ip
rabbit_port=api_rabbit_port
rabbit_username=api_rabbit_user
rabbit_password=api_rabbit_password
rabbit_virtual_host=api_rabbit_vhost
[cells]
enable=True
name=API_CELL_NAME
cell_type=api
Configuring the Compute Cells
To configure the compute cells we had to add the following lines to /etc/nova/nova.conf:
[default]
quota_driver=nova.quota.NoopQuotaDriver
rabbit_host=cellX_rabbit_ip
rabbit_port=cellX_rabbit_port
rabbit_username=cellX_rabbit_user
rabbit_password=cellX_rabbit_password
rabbit_virtual_host=cellX_rabbit_vhost
[cells]
enable=True
name=CELLX_NAME
cell_type=compute
Finally run this command on the API Cell for each child (Compute) and in each child to connect to the API Cell.
nova-manage cell create --name cell_name --cell_type child/parent \

--username cell_user --password cell_passwd --hostname cell_rabbit_host \

--port cell_rabbit_port --virtual_host cell_rabbit_vhost --woffset 1.0 --wscale 1.0
Installing from scratch
Installing a Cell based system from scratch is easier than converting an existing deployment in terms of placing the right services on the right systems, although it probably requires more work setting up the configuration files.
Conclusions
In this blog post we presented an overview of Nova Cells and how a basic configuration can be set up. Our initial experimentation shows the system to be quite stable and the design offers much greater flexibility and elasticity to an Openstack deployment – cells can be easily added, changes to the cell hierarchy are straightforward – and also looked reasonably robust in terms of standard operations such as start and remove vms, etc. We are still investigating whether Nova Cells meets the requirements of our pilot deployment, so stay tuned as we investigate it further!
Useful readings:
- Exploring Openstack Nova Cells
- Converting to Openstack Nova Cells Without Destroying the World
- What are Openstack Cells
- Compute Cells for Grizzly
- Blueprint Nova Cells