In this part of the Dependability Modeling article series we explain how a test framework on an OpenStack architecture can be established. The test procedure has 4 steps: in a first step, we implement the OpenStack environment following the planned system architecture. In the second step we calculate the probabilities of component outages during a given timeframe (e. g. 1 year). Then we start a Chaos Monkey script which “attacks” (randomly disables) the components of the system environment using the calculated probabilities as a base for the attack. As a last step we measure the impact of the Chaos Monkey attack according to the table of failure impact sizes we created in part 2. The impact of the attack should be stored as dataset in a database. Steps 1-4 form one test run. Multiple test runs can be performed on multiple architectures to create a empirical data which allows us to rate the different OpenStack architectures according to their availability.
Step 1: Implement system architecture
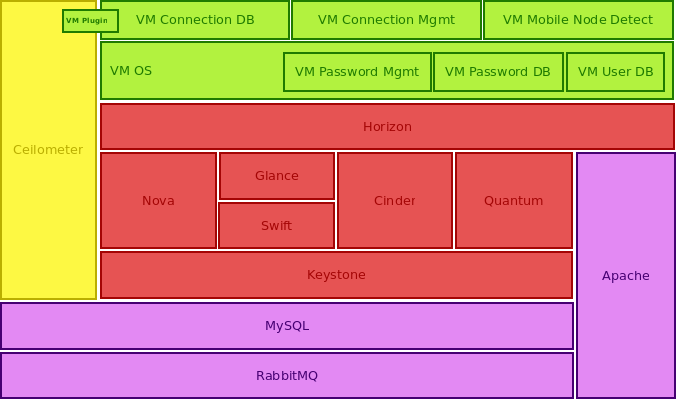
Implementation of an OpenStack architecture can be achieved quite straightforward by using the Vagrant-Devstack installation. Each OpenStack node can be set up as Vagrant-Devstack system. First install Virtualbox, then install Vagrant and then install Vagrant-Devstack. Configure Devstack to support a Multi-node environment. As a next step you should create an SSH Tunnel between the different nodes using Vagrant. Once the different VM nodes are ready, you can start to test the architecture. (Fig.1) includes a typical OpenStack architecture for a single OpenStack node.
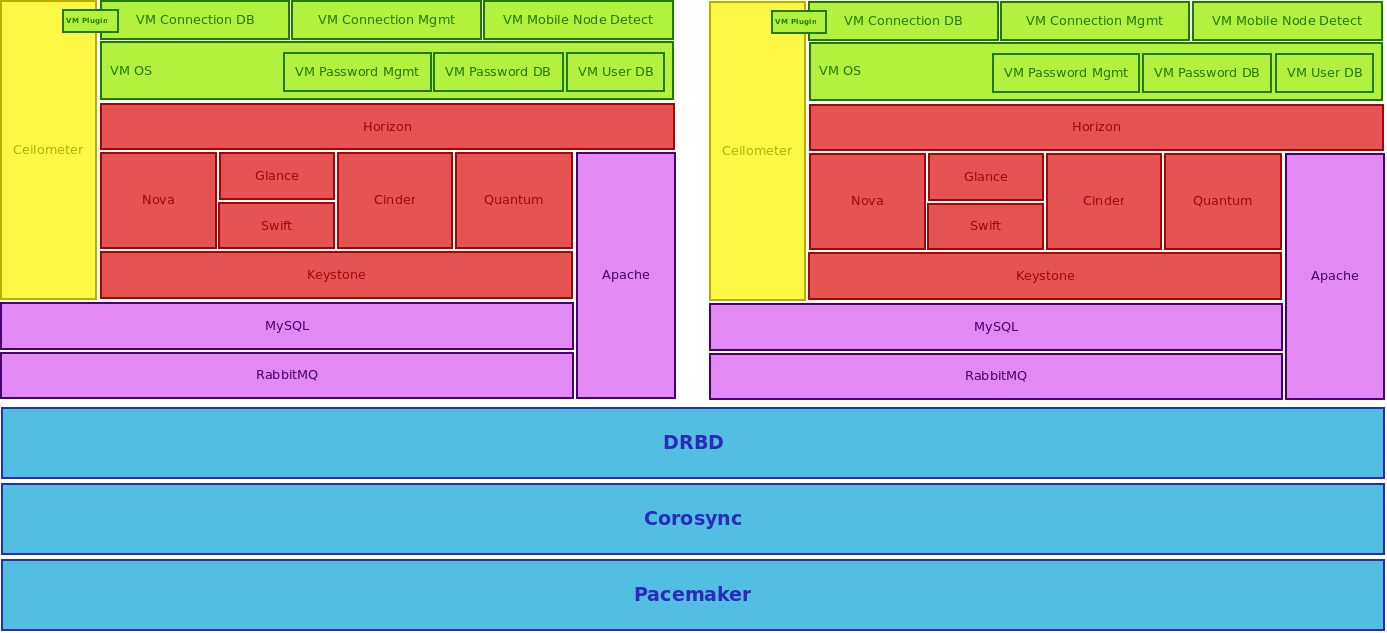
High availability is usually only possible in a multi-node environment, because redundant nodes are needed in case of node failures and consequent failovers. Therefore your architecture must be an architecture which is distributed or clustered over several redundant nodes. An example of such an architecture is shown in (Fig. 2). Once the architecture is defined, you have to implement it by using Vagrant, Puppet and Devstack.
Step 2: Calculate outage probability
Availability is usually measured during a given time period (e. g. one year). It is the fraction of uptime divided by total time. If we want to calculate the risk/probability of outages in the observed period, we must know at least two values: the total downtime of a component (which can be evaluated when the availability is known) and the average recovery time. Both values are parameters which are needed to estimate the number of outages in the observed time period. In (Tab. 1) we have a list of all OpenStack components which are present in one node of the OpenStack installation. Availability is observed for a time period of one year (= 31’535’000 seconds). If we assign each component an availability value and an average recovery time, we can calculate the downtime and the number of outages per year. Because we are interested in the outage risk, we calculate the risk by dividing the number of total outages by the number of days per year. The calculated outage risks can be used now to simulate a typical operational day of the observed OpenStack system.

Step 3: Run Chaos Monkey attack
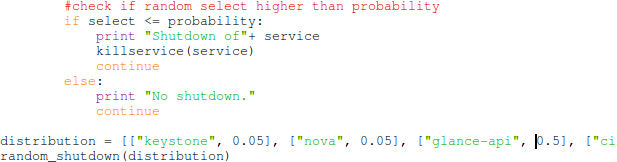
Although Chaos Monkey disables devices randomly, a realistic test assumes that outages do not occur completely randomly. A Chaos Monkey attack should be executed only with probability – not with certainty. Therefore we must create a script which disables the OpenStack services with probabilities we defined in (Tab. 1). Such a script could be written in Python – as shown in (Fig. 2). The most important part of the shutdown mechanism is that probabilities should be assignable to the services we want to disable. The probabilities will be taken from the values we have calculated in (Tab. 1). The other part should be that execution of Chaos Monkey attacks follows a random procedure. This can be achieved by using a simple random number generator which generates a number between 0 and 1. If the random number is smaller than the probability, the Chaos Monkey attack is execeuted (otherwise nothing is performed). This way we can simulate random occurence of outages as if it would be the case in a real OpenStack installation that runs in operational mode.
Step 4: Poll impact of failure
Once the Chaos Monkey attack has been performed, one has to check the impact size of the outage. Failure impact size equals the values in the table of failure impact sizes (Tab. 2). The table of failure impact sizes is derived from the execution of Dependability Modeling (as explained in article 2 of this series). The task at hand is now to poll which user interactions are still available after the Chaos Monkey attack. This can be done by performing the use cases which are affected by an outage of a component. The test tool must be a script which programmatically runs the use cases as tests. If a test fails, the failure impact size is raised according of the weight of the use case. The result of such a test run is a failure impact size after the Chaos Monkey attack.

Cleanup and re-run the test
Test results should be stored in a database. This database should contain failure impact sizes, assumed availabilities and average recovery times as well as information about the system architecture that has been used. When a test run has been completed, the results of the Chaos Monkey attacks have to be reverted in order to be able to re-run the test. With each test-run the database is filled up and one can be more certain about the test results.
Further test runs can be started either with the same architectural setup or with another one: instead of a one-node installation one could use a two-node OpenStack installation, one could use Ceph and Pacemaker as HA clustering software and try different technologies. If we perform steps 1-4 repeatedly, we can rate different OpenStack architectures according to their resistance against outages and find out which architecture fits best to High Availability goals.
If the test framework is applied to an OpenStack environment like e. g. Mobile Cloud Network, High Availability characteristics can be ensured more confidently. Dependability modeling is a useful recipe to test OpenStack architectures from an end users’ perspective. The capabilities of the explained method have not been explored in detail yet, but more will follow soon.