In this blog post we will describe the necessary steps to get an installation of OpenShift Origin v3 up and running on OpenStack. OpenShift Origin v3 offers a ton of features over its predecessor we covered over a year ago. Most notably is the support for Docker containers and the usage of Kubernetes.
Getting ready
Before we start the installation, a few prerequisites must be met.
This tutorial relies on the official Ansible installer, therefore you need to install Ansible on your system of choice. Instructions for the installation for various platforms can be found here.
As we are going to deploy OpenShift Origin V3 on OpenStack, you need to have access to an OpenStack cloud that features the orchestrator Heat and uses Neutron for networking and have appropriate quotas set on your tenant. Depending on the size of your OpenShift deployment, more or less is required, but take these guidelines as a recommended minimum:
- Compute: 5*m1.large or equivalent flavor
- Networking: 5 Floating IPs, 1 network/subnet/router, 3 security groups
Your OpenStack installation requires a CentOS 7.1 image available to your user. If it is not available, you can get the latest one here.
Last but not least, you need access to a domain or subdomain and DNS server where you can create A records and wildcard A records.
Starting the installation
Start the installation by cloning the installer from git:
git clone https://github.com/openshift/openshift-ansible.git
cd openshift-ansible
Next, make sure you have your OpenStack credentials in your shells environment. This might look something like this:
source openstack-openrc.sh
Now we start the actual installation via the installer:
bin/cluster create -t origin \
-n 3 \
-o image_name=CentOS-7-Generic-Cloud \
-o external_net=external-net \
-o floating_ip_pool=external-net \
-o master_flavor=m1.large \
-o node_flavor=m1.large \
-o infra_flavor=m1.large \
openstack \
opsv3
Make sure to adopt the parameters to your OpenStack environment. Here is a brief explanation of the parameters:
bin/cluster create -t origin: deploy the free "Origin" version
-n: number of compute nodes to provision
-o image_name: name of the CentOS image to use
-o external_net: your external network
-o floating_ip_pool: network for floating ips
-o master_flavor/node_flavor/infra_flavor: flavors for the roles
openstack: use the openstack provider
opsv3: name for the Heat Stack created
The installation will take a while, consider having a coffee 😉
Post-Install
Once the installation is done, a few modifications are necessary to finish the setup. First, ssh to your master node. To find its IP address, either use the OpenStack Dashboard Horizon or the CLI:
# heat output-show ${STACK_ID} master_floating_ips
On the master node, edit /etc/origin/master/master-config.yaml with the editor of your choice. Replace the following values with your your domain:
* masterPublicURL
* assetPublicURL
* publicURL
* corsAllowedOrigins
* subdomain
Note that some values have multiple occurrences in the file. Below are example values for our domain openshift3.cloudcomplab.ch:
assetConfig:
  masterPublicURL: https://master.openshift3.cloudcomplab.ch:8443
  publicURL: https://master.openshift3.cloudcomplab.ch:8443/console/
oauthConfig:
  assetPublicURL: https://master.openshift3.cloudcomplab.ch:8443/console/
corsAllowedOrigins:
 - master.openshift3.cloudcomplab.ch
 - openshift3.cloudcomplab.ch
 - 160.85.4.68
routingConfig:
 subdomain: "apps.openshift3.cloudcomplab.ch"
Next, we are going to replace all occurrences of opsv3-master-0.novalocal to our masters domain name in a couple of files:
/etc/origin/master/admin.kubeconfig
/etc/origin/master/openshift-master.kubeconfig
/etc/origin/master/openshift-registry.kubeconfig
/etc/origin/master/openshift-router.kubeconfig
Please note that the novalocal name might be slightly different in your installation depending on the name you specified by the installer.
Create the Docker Registry
Next, we create a local docker registry. This is easily accomplished with a single command as seen below. The oadm command is used for the administration features of OpenShift 3.
oadm registry --config=/etc/origin/master/admin.kubeconfig \
--credentials=/etc/origin/master/openshift-registry.kubeconfig
Create the Service Router
Creating the service router is a little more work. We will work with the oc command, which handles the basic user interactions with OpenShift 3 on your command line. First we create a new service account:
echo '{"kind":"ServiceAccount","apiVersion":"v1","metadata":{"name":"router"}}' | oc create -f -
Next, we add the created service account to the privileged users:
oc edit scc privileged
This opens a file in your $EDITOR. Add the following line under users:
users:
- system:serviceaccount:default:router
Now we are ready to create the service router:
oadm router service-router --replicas=4 --credentials=/etc/origin/master/openshift-router.kubeconfig --service-account=router
Note that we specified 4 replicas. This matches the amount of compute-nodes we specified in the installer plus the infrastructure node that also serves as a compute node. This way, a service router is deployed on each node. In the past we experienced problems with the service router dying and getting rescheduled to a different node. This way, OpenShift will keep a service router on every node at any time.
To verify that each node has a service router, use something along these lines:
# oc get pods | grep service-router-1 | while read pod trash ; do oc describe pods ${pod} | grep 'Node:\|^Name:' ; done
Name: service-router-1-2lzm2
Node: 192.168.113.5/192.168.113.5
Name: service-router-1-hx767
Node: 192.168.113.6/192.168.113.6
Name: service-router-1-ra2um
Node: 192.168.113.7/192.168.113.7
Name: service-router-1-z6qys
Node: 192.168.113.3/192.168.113.3
DNS setup
Lastly, we create the necessary DNS records. This will differ depending on your DNS setup. In our case, we use CloudFlare as our DNS service, below is an image of the relevant DNS records created:
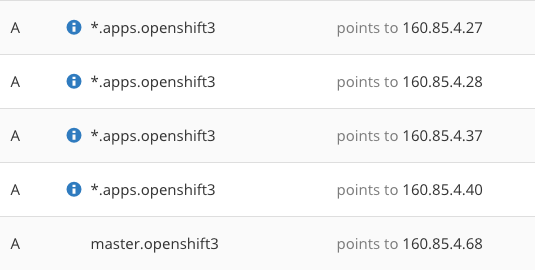
As you can see, there is an A record for the master as well as a wildcard A record for the subdomain that points to all our compute nodes.
Take OpenShift for a spin!
Now your initial OpenShift setup is complete. As further steps, you might want to configure authentication or try out one of the examples.
Thanks for the tutorial. Is this for some specific Openstack version? I am installing on IceHouse and got below error when executing the command:
bin/cluster create -t origin \
> -n 3 \
> -o image_name=CentOS7.1 \
> -o external_net=ext_net \
> -o floating_ip_pool=ext_net \
> -o master_flavor=m1.large \
> -o node_flavor=m1.large \
> -o infra_flavor=m1.large \
> openstack \
> opsv3
—
ERROR: Inventory script (inventory/openstack/hosts/nova.py) had an execution error: Traceback (most recent call last):
File “/home/suryaveer/openshift-ansible/inventory/openstack/hosts/nova.py”, line 26, in
from novaclient import client as nova_client
ImportError: No module named novaclient
I cloned the ansible repository today. I have no idea about this error and how to proceed.
Please help.
Thanks
Hey there!
Sorry for the late reply.
We tested the tutorial on our OpenStack Juno setups. From the error message i suspect you do not have the nova cli installed (No module named novaclient).
Try the following: pip install python-novaclient
See here for more information about installing the OpenStack CLIs: http://docs.openstack.org/user-guide/common/cli_install_openstack_command_line_clients.html
Hi,
Thanks for replying. I am not sure from where to execute ansible so I ran it from another system outside openstack.
Then I ran it from controller node of OpenStack and below is the error:
controller@controller:/openshift-ansible$ bin/cluster create -t origin -n 3 -o image_name=CentOS7.1 -o external_net=ext_net -o floating_ip_pool=ext_net -o master_flavor=m1.large -o node_flavor=m1.large -o infra_flavor=m1.large openstack opsv3
ERROR: Inventory script (inventory/openstack/hosts/nova.py) had an execution error: Traceback (most recent call last):
File “/openshift-ansible/inventory/openstack/hosts/nova.py”, line 178, in
service_type=config.get(‘openstack’, ‘service_type’),
File “/usr/lib/python2.7/dist-packages/novaclient/client.py”, line 506, in Client
return client_class(*args, **kwargs)
File “/usr/lib/python2.7/dist-packages/novaclient/v1_1/client.py”, line 148, in __init__
cacert=cacert)
File “/usr/lib/python2.7/dist-packages/novaclient/client.py”, line 86, in __init__
self.auth_url = auth_url.rstrip(‘/’)
AttributeError: ‘NoneType’ object has no attribute ‘rstrip’
ACTION [create] failed: Command ‘ansible-playbook -i inventory/openstack/hosts -e ‘num_masters=1 cli_external_net=ext_net num_nodes=3 cli_node_flavor=m1.large cluster_id=opsv3 cli_floating_ip_pool=ext_net cli_image_name=CentOS7.1 num_etcd=0 cli_master_flavor=m1.large cli_infra_flavor=m1.large num_infra=1 deployment_type=origin’ playbooks/openstack/openshift-cluster/launch.yml’ returned non-zero exit status 1
I’ll now install the CLI on the system and try again.
Thanks
I installed the nova cli and executed but it failed again with below errors, this is from system outside openstack.
PLAY [Launch instance(s)] *****************************************************
TASK: [fail ] *****************************************************************
skipping: [localhost]
TASK: [Check OpenStack stack] *************************************************
fatal: [localhost] => error while evaluating conditional: stack_show_result.rc != 0 and ‘Stack not found’ not in stack_show_result.stderr
FATAL: all hosts have already failed — aborting
PLAY RECAP ********************************************************************
to retry, use: –limit @/home/suryaveer/launch.retry
localhost : ok=0 changed=0 unreachable=1 failed=0
ACTION [create] failed: Command ‘ansible-playbook -i inventory/openstack/hosts -e ‘num_masters=1 cli_external_net=ext_net num_nodes=3 cli_node_flavor=m1.large cluster_id=opsv3 cli_floating_ip_pool=ext_net cli_image_name=CentOS7.1 num_etcd=0 cli_master_flavor=m1.large cli_infra_flavor=m1.large num_infra=1 deployment_type=origin’ playbooks/openstack/openshift-cluster/launch.yml’ returned non-zero exit status 3
Thanks
Hey there!
It does not matter where you run ansible from, as long as you got access to your OpenStack APIs.
Regarding your next error message: It seems the OpenStack Heat stack failed to create. This can have numerous causes. Are you able to create Heat Stacks manually? (e.g. this very simple Heat manifest: https://gist.github.com/michaelerne/125d7eaf9ede4d822ae5)
If that succeeds, try investigating why the Heat Stack creation failed by using the Heat CLI: heat stack-list to get the name (will be something with opsv3 in its name) and heat stack-show $name to get further details.
Thanks
Hi,
I am able to create heat stack. That error was I guess because I didn’t had heat cli. I installed heat,neutron, nova cli and then this error:
The template version is invalid: Unknown version (heat_template_version: 2014-10-16). Should be one of: 2012-12-12, 2013-05-23, 2010-09-09
Full log:
failed: [localhost] => {“changed”: true, “cmd”: [“heat”, “stack-create”, “-f”, “files/heat_stack.yaml”, “-P”, “cluster_id=opsv3”, “-P”, “cidr=192.168.122.0/24”, “-P”, “dns_nameservers=8.8.8.8,8.8.4.4”, “-P”, “external_net=ext_net”, “-P”, “floating_ip_pool=ext_net”, “-P”, “ssh_public_key=ssh-rsa OFrgtlUjQnhtBfR root@controller”, “-P”, “ssh_incoming=0.0.0.0/0”, “-P”, “num_masters=1”, “-P”, “num_nodes=3”, “-P”, “num_infra=1”, “-P”, “master_image=CentOS7.1”, “-P”, “node_image=CentOS7.1”, “-P”, “infra_image=CentOS7.1”, “-P”, “master_flavor=m1.large”, “-P”, “node_flavor=m1.large”, “-P”, “infra_flavor=m1.large”, “openshift-ansible-opsv3-stack”], “delta”: “0:00:00.470600”, “end”: “2015-12-03 18:38:03.147854”, “rc”: 1, “start”: “2015-12-03 18:38:02.677254”, “warnings”: []}
stderr: ERROR: The template version is invalid: Unknown version (heat_template_version: 2014-10-16). Should be one of: 2012-12-12, 2013-05-23, 2010-09-09
FATAL: all hosts have already failed — aborting
Thanks
My guess is, this is a version issue. Maybe icehouse doesn’t support this version of heat template.
Please comment.
Thanks
Hey There!
I agree, it seems not to work at all with Icehouse as Heat does not support the required template version. I updated the blog post above to reflect that requirement.
Thanks for helping us out discovering this and sorry that we were not more clear from the beginning.
Thanks
Thanks for confirming.
Do you have any reference for doing the same with IceHouse.
Thanks
very nice and informative, looking for openstack tutorial, recently joined in http://www.kerneltraining.com/openstack/, can anyone suggest me some books and videos.