As the trend continues to move towards Serverless Computing, Edge Computing and Functions as a Service (FaaS), the need for a storage system that can adapt to these architectures grows ever bigger. In a scenario where smart cars have to make decisions on a whim, there is no chance for that car to ask a data center what to do in this scenario. These scenarios constitute a driver for new storage solutions in more distributed architectures. In our work, we have been considering a scenario in which there is a distributed storage solution which exposes different local endpoints to applications distributed over a mix of cloud and local resources; such applications can give the storage infrastructure and indicator of the nature of the data which can then be used to determine where it should be stored. For example, data could be considered to be either latency-sensitive (in which case the storage system should try to store it as locally as possible) or loss sensitive (in which case the storage system should ensure it is on reliable storage).
Because Object Storage is very fitting for the idea of FaaS (see here) we decided to use OpenStack Swift – with which we had some experience – and make some modifications to support an edge computing context. The way we envisioned Swift to work in this scenario is that there are two Swift instances, one being the local or edge deployment and the other being the remote or data center deployment, each of which offers a local endpoint to a distributed application: functionality running on the edge can communicate with the edge Swift instance; functionality running in the cloud can access the cloud Swift instance. When data is latency-sensitive it is usually stored on the edge and when it is to be more persistently saved it will be pushed to the data center where there are more resources and storage space to appropriately save of the data.
Approach 1: modifying the proxy server
The first Approach we considered was to modify the Swift Proxy Server in a way that can distinguish between the different types of data. The path to an object in Swift is http://localhost:8080/v1/AUTH_test/container/object, we used this to make the data distinguishable. At first we thought about adding metadata to an object when uploading it to identify where the object should be stored. This didn’t work for us as we had trouble parsing the metadata at the point where we implemented the distinction if the object is to be stored remote or local. So the approach was designed with the idea that if the container name contained an indicator that the object is to be pushed remote from the current Swift storage. This indicator was added as a prefix for the container name called 'remote_' This was implemented in the proxy-server by parsing the path of the object and looking for the indicator. So a call to the remote Swift would look something like this: http://localhost:8080/v1/AUTH_test/remote_container/object
The changes in code have been made in /swift/swift/proxy/server.py which is the entry point to the whole Swift environment. The get_controller method was the method where we implemented our changes, as there the controllers for the account, container and the object get instantiated and this is where the code needs to make the distinction before it pushes the object locally.
Results
The test environment consists of three VMs, all of them are running:
- Ubuntu 16.04
- 4GB RAM
- 2 VCPU
- 40GB disk space
The VMs are meant to simulate three different setups:
- A device that accesses the Swift storage
- An edge “micro data center” that should represent limited storage capacity, but low latency
- And the cloud, which is to represent higher storage capacity, redundancy but a higher latency
With tc qdisc we added the latency between the VMs to have some similar results as what we expect to be the round trip delay between these machines.

The way the tests were done is that from the device VM a HTTP request has been made with curl to first upload files of sizes from 10kb up to 100mb.
First the uploads – using a HTTP PUT with curl – were done without the remote indicator so that all the files are stored on the edge (blue line). Afterwards the uploads with the remote indicator were done, so that swift automatically pushes the file on to the cloud (red line).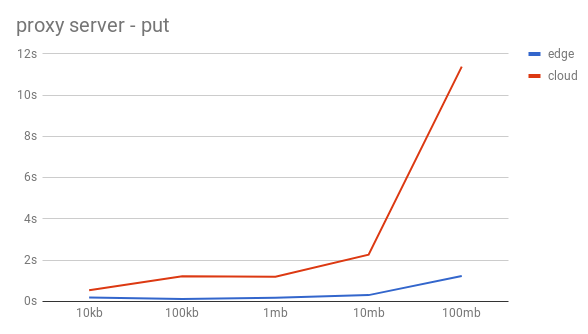
The object was retrieved using HTTP GET with curl to get each file from the edge and from the cloud alike.
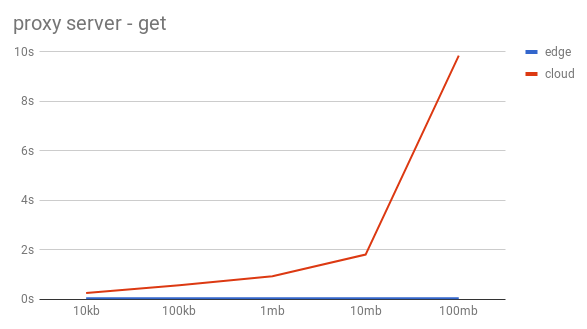
As the graphs can quite clearly show this approach is slow and absolutely not imaginable in a production deployment. The scaling is very bad and nowhere near useful in a daily use. Both the put and the get are very slow, but the way the get scaled is so much worse than the upload that we had to scrape this idea, because we didn’t believe that optimizing our code would help much.
Approach 2: write a middleware
As the results from the modified proxy server show that this is an approach that is not viable we decided to try something more normal in the Swift universe, which is to write a middleware for Swift to handle the redirects. Middlewares in Swift are compareable to Lego pieces that can be plugged into the pipeline, which defines the codeflow of Swift. and can be used to add extra functionalities such as access controls, authentications, logging etc. The default pipeline of swift looks like this (it can be found in the configuration file of the proxy server)
[pipeline:main]
# This sample pipeline uses tempauth and is used for SAIO dev work and
# testing.
pipeline = catch_errors gatekeeper healthcheck proxy-logging cache container_sync bulk tempurl ratelimit crossdomain authtoken keystoneauth tempauth  formpost staticweb copy container-quotas account-quotas slo dlo versioned_writes proxy-logging  proxy-serve
When writing your own middleware you have to add your middleware in the pipeline and add the configurations for it. We advise you to add your .py file which is the middleware in to the /swift/swift/common/middleware directory. By doing this and adding the entrypoint of your middleware to the following file: /swift/swift.egg-info/entry-points.txt like this:
redirectmiddleware = swift.common.middleware.redirectmiddleware:redirect_factoryResults
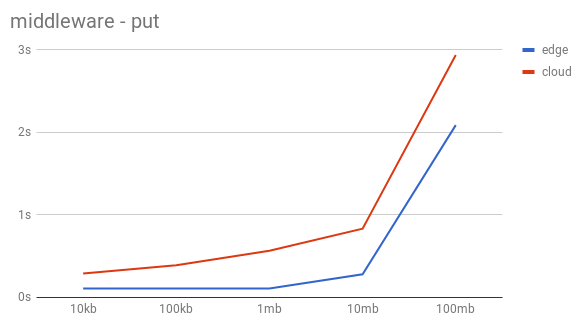
The test setup was the same with the only difference being that the middleware is added to this Swift instead of having the proxy server modified. As graphs show the performance is significantly better than the previous approach.
The results for remote uploads scale more parallel to the local uploads than with the first approach which makes this approach more realistic to imagine being used in a daily scenario. Of course the performance could improve and the issue with authentication is not yet solved for this scenario, but we believe it to be the better solution, especially compared to the first approach.
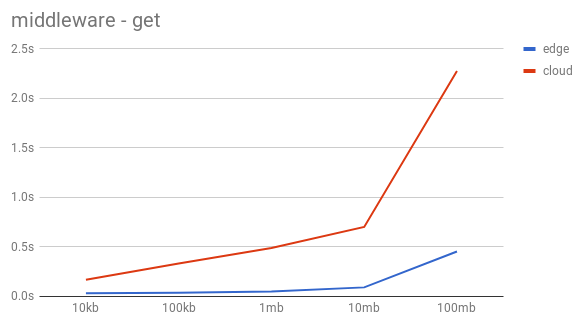
The HTTP GET doesn’t scale as well as the PUT, the time gap between the remote and the local downloads gets bigger by the size of the objects. The download time for bigger files is significantly longer for remote files than for local files, yet still a lot better than the previous approach.
Lessons learnt
After spending quite some time looking into the inner workings of Swift, I can say we learnt a lot about Swift and how it works and handles requests. Also I believe we can say that the code of Swift should not be touched or changed in a deployed or even a test environment as it’s very intricate and has a lot of components. If you want to try to change some code in Swift we advise you to create a simple VM to test your changes and get comfortable with how Swift works (a tutorial to creating a Swift VM can be found on this blog very soon). As for functionality that you want to introduce in to the Swift code writing a Swift Middleware is highly advised. It will make your life a lot easier and it’s intended to be used in that way.
Future direction
One thing that could be looked inot is a solution where Swift could take data and independently decide if the object is to be stored locally or remote without the user input or indicator. Another thing that would be good to look into, is the possibility to use metadata to label the objects instead of using indicators in the container names. The last issue that would need to be resolved is the authentication issue that at the moment doesn’t allow the redirect.
Have you considered using Swift storage policies[0]. You could create different rings that would allow you to place data in different locations based on how the policy was defined.
[0] – https://docs.openstack.org/swift/latest/overview_policies.html