In this article I will show how to install a Windows 7 64-Bit image on OpenStack. For different versions of Windows watch out for the corresponding notes in the article.
Prepare the Installation
Ubuntu, QEMU and KVM
Creating a Windows image from scratch is best done by using a linux distribution to do the installation process. To create the image we will use QEMU and KVM , which is a full virtualization solution for Linux. On Ubuntu you can install KVM using the following commands in the shell:
$ sudo apt-get update
$ sudo apt-get install qemu-system-x86
$ sudo apt-get install qemu-kvm
$ sudo apt-get install virt-manager
$ sudo apt-get install libvirt-bin libvirt-doc
If you are working on a Windows or Mac machine you can not use a Linux-VM to do the installation. The VM will not be able to use the hardware virtualization extension (Intel VT or AMD-V).
ISO Files
To store the iso files we create a directory called “iso” in the home directory. That step is not mandatory, but will help you to use the following commands.
$ mkdir ~/iso
Windows ISO
First you need an iso-file of Windows. Download a Windows ISO-File from your preferred site; e.g. a link for Windows 7 Professional can be found on the community website of microsoft ). Move the iso file in the “iso” directory.
As for all Microsoft products you need to buy a license key to use the operating system, even if it is used as a VM.
VirtIO ISO
The tricky part to create a Windows image for OpenStack is to use the proper driver for the virtualized hardware components like the IDE controller and the network interface. Download the latest digital signed VirtIO drivers from Fedora and move it to the iso directory.
Create the image
Create the container file
Now after doing all preparation steps we can create the image. This image file will hold the Windows installation. Like before you could create a directory called “image” on your home directory to store the image file.
$ mkdir ~/image
$ cd ~/image
Use the following QEMU command to create the image file.
$ qemu-img create -f qcow2 win7_sp1_x64_en_vlk.qcow2 100G
That command will create a image with qcow2 as format, win7_sp1_x64_en_vlk.qcow2 as a name and with a capacity of 100GB. At the moment that is only a container for the installation.
Start the VM
The next step is to launch a VM with KVM and start the Windows installation.
$ sudo kvm -m 2048 -drive file=~/iso/windows_7_professional.iso,index=1,media=cdrom -drive file=~/image/win7_sp1_x64_en_vlk.qcow2,if=virtio -drive file=~/iso/virtio-win-0.1-74.iso,index=3,media=cdrom -net nic,model=virtio -net user -nographic -vnc :9 -usbdevice tablet
That command will start a VM with following settings:
- -m 2048: does allocate the memory size of the VM
- -drive file=~/iso/windows_7_professional.iso,index=1,media=cdrom: the VM will have a virtual CD-ROM drive attached containing the Windows 7 iso (will act like a normal Windows 7 installation CD/DVD)
- -drive file=~/iso/virtio-win-0.1-74.iso,index=3,media=cdrom: the VM will have a virtual CD-ROM drive attached containing the VirtIO iso
- -drive file=~/image/win7_sp1_x64_en_vlk.qcow2,if=virtio: the VM will have a virtual hard disk attached which will use the image file we just created as storage and the VirtIO drives as a storage interface
- -net nic,model=virtio -net user: sets the VirtIO driver for the network interface card (nic) with a user-mode network stack that bridges to the host’s network
- -nographic: disables graphical output
- -vnc :9: enables VNC on port 5909
- -usbdevice tablet: Use an USB tablet instead of the default PS/2 mouse. Recommend, because the tablet sends the mouse cursor’s position to match the host mouse cursor.
VNC-Connection
Use a VNC-Client to connect to your new VM (on Ubuntu you can use Remmina, which is part of the distribution). The server is reachable on the server address: localhost:5909.
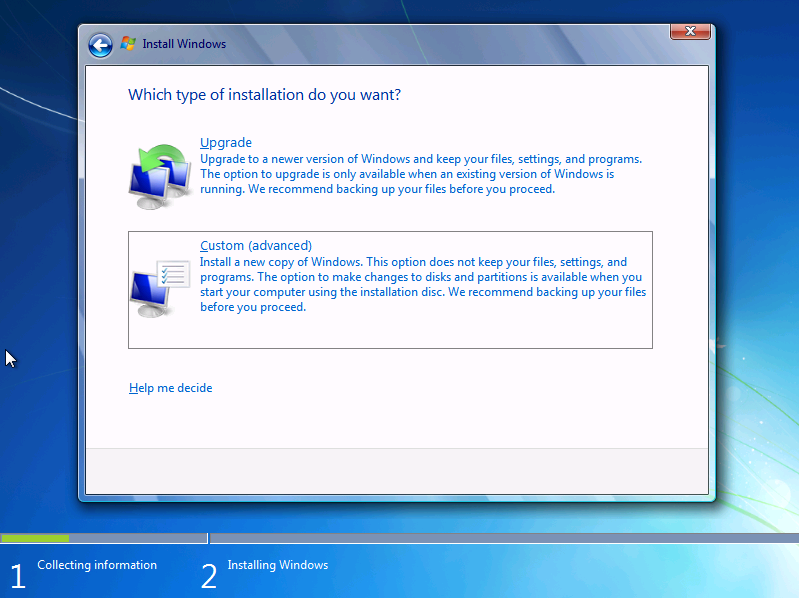
The first one is while choosing the type of installation. You need to do a custom installation, which allows you to install the VirtIO drivers.
Choose “Custom (advanced)”.
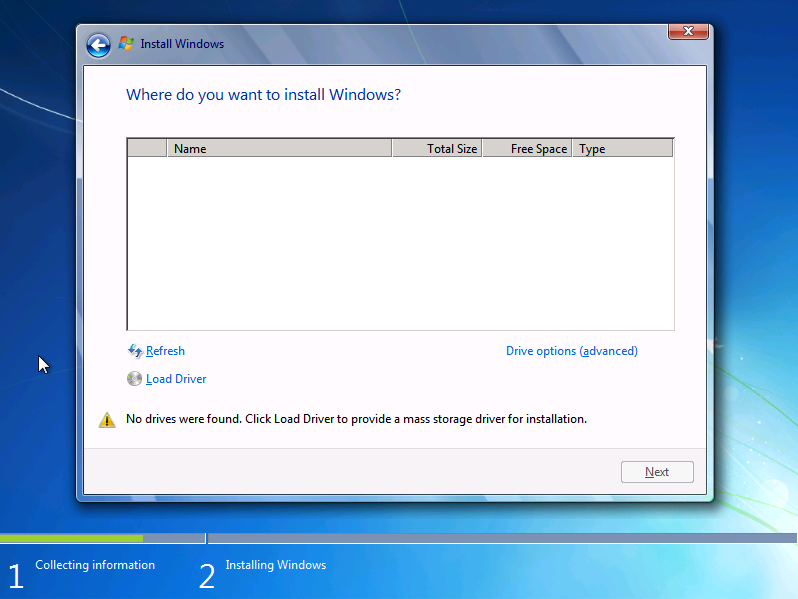
Select “Load Driver”.
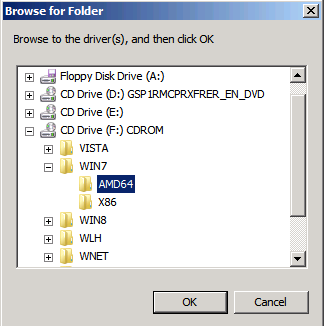
Navigate to the CD Drive with the VirtIO drivers . For the Windows 7 64bit version you need to select the “WIN7” -> “AMD64” directory. Click “OK”.
Find the right driver for your Windows Version:
| Windows Version | Directory |
| Windows Server 2008 32-bit | \VISTA\X86 |
| Windows Server 2008 64-bit | \VISTA\AMD64 |
| Windows Server 2008 R2 32-bit | \WLH\X86 |
| Windows Server 2008 R2 64-bit | \WLH\AMD64 |
| Windows 7 32-bit | \WIN7\X86 |
| Windows 7 64-bit | \WIN7\AMD64 |
| Windows 8 32-bit | \WIN8\X86 |
| Windows 8 64-bit | \WIN8\AMD64 |
| Windows Server 2012 | \WIN8\X86 |
| Windows Server 2012 | \WIN8\AMD64 |
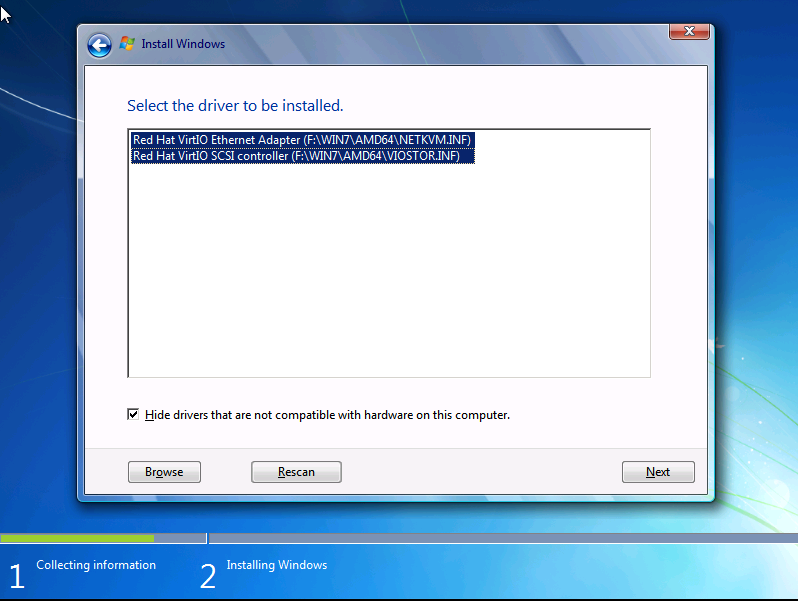
Select the listed drivers (one for the Ethernet Adapter and one for the Hard Disk Controller). Click “Next”.
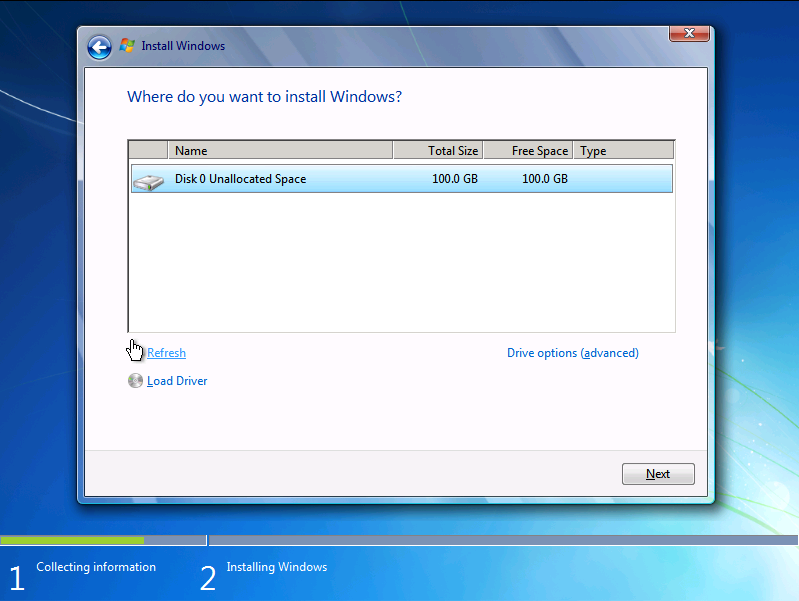
Now you should be able to select the prepared image file as the disk for the installation.
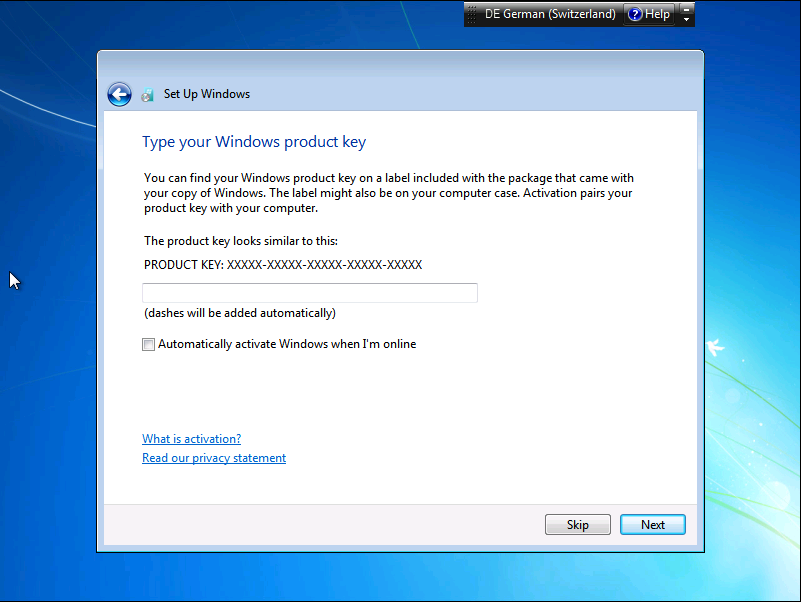
The second step of the installation where you need to be careful is when you have to insert the Windows product key.
This step is not crucial. You do not have to insert the product key right now. Windows will run for 30 days without product key. So it could be handy to insert the product key and activate Windows when the installation is completely done and Windows is running on OpenStack without troubles.
Click on “Skip”.
Finish the installation, but do not install the updates right away. You will do that on OpenStack.
Image is complete
The underlying image file that you created further up with the shell command qemu-img create, such as ~/image/win7_sp1_x64_en_vlk.qcow2 is now ready for uploading to the OpenStack Image Service.
Upload image
At that point the image should be about 8GB big for Windows 7. That image can now be uploaded to OpenStack. There are mainly 2 ways to do that; either by the OpenStack Dashboard or the CLI-client. The size of Windows images can grow rapidly. After an update you might end with a size of 17GB. We had problems to upload big images, so try out both upload method.
OpenStack Dashboard
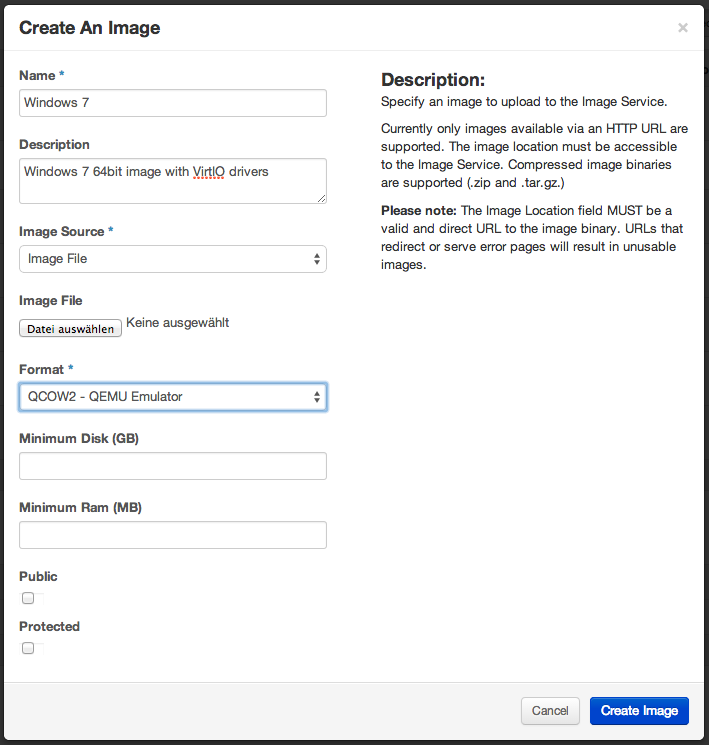
To upload the image you can login to the dashboard, switch to “Images & Snapshots” and click on the “+ create Image” button.
The image can be uploaded from a valid HTTP URL or from the local disk.
The format needs to be QCOW2.
OpenStack CLI-client
You can use the python glance client to upload the image via a terminal. Install the python client and than use the command similar to the following one to upload the image:
glance image-create \
--name Windows-7 \
--disk-format=qcow2 \
--container-format=bare \
--property hw_disk_bus=virtio \
--property hw_vif_model=virtio \
--file=./win7sp1_x64_vlk.qcow2
The meaning of the parameters are as follows:
- — name: sets a name for the image
- — disk-format: file format of the disk image, qcow2 is the file-format supported by QEMU
- — container-format: container which holds the image and metadata, bare indicates there is no container or metadata
- — property hw_disk_bus: sets metadata properties on glance, here: sets the disk controller to virtio
- — property hw_vif_model: sets metadata properties on glance, here: specifies the model of the network interface device to virtio
- — file: location of the file that needs to be uploaded
Use the image
Launch an instance of Windows image
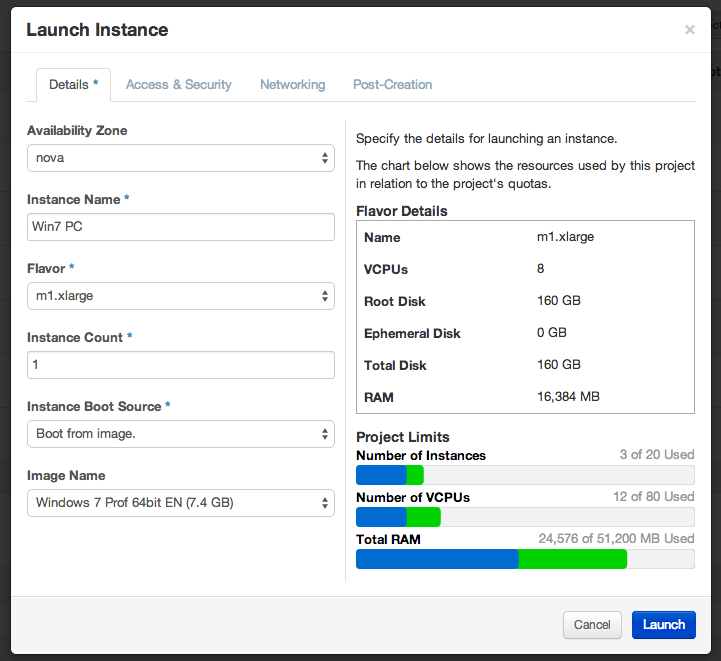
On the dashboard you need to go to the image section. There you can create an instance from your new Windows image.
Choose the flavor which fits the disk size of the image. In our case the disk size of the image was set to 100GB so we choose the flavor with 160GB total disk.
The first build of the VM can take a while.
Connect to Windows
Click on the Windows instance and than on “Console”. This will open a connection through the embedded VNC client of the browser. If all went right the Windows welcome screen should show up.
Remote Access Protocol (RDP)
To be able to use the RDP to open a connection to Windows you need to enable the access in the Windows settings. From a RDP client you can than connect to the VM by using its allocated floating IP address. The standard port for RDP is 3389.
Enable the remote desktop on Windows
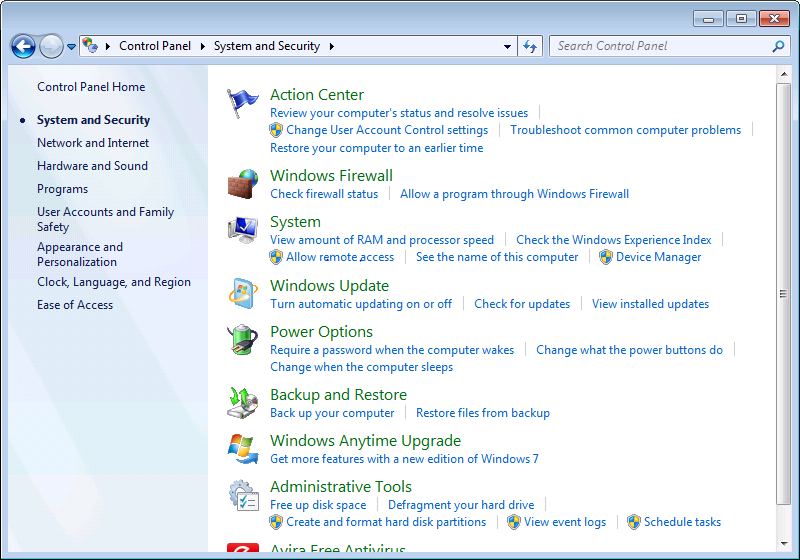
Open the “Control Panel” and chose “Allow remote access” from “System”.
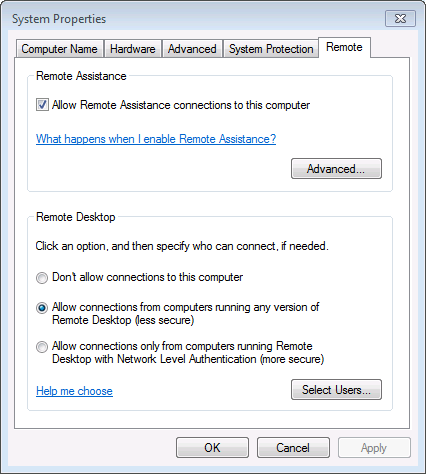
Select the middle option: “Allow connections from computers running any version of Remote Desktop”
This will do the necessary firewall settings.
Enable the remote desktop on OpenStack
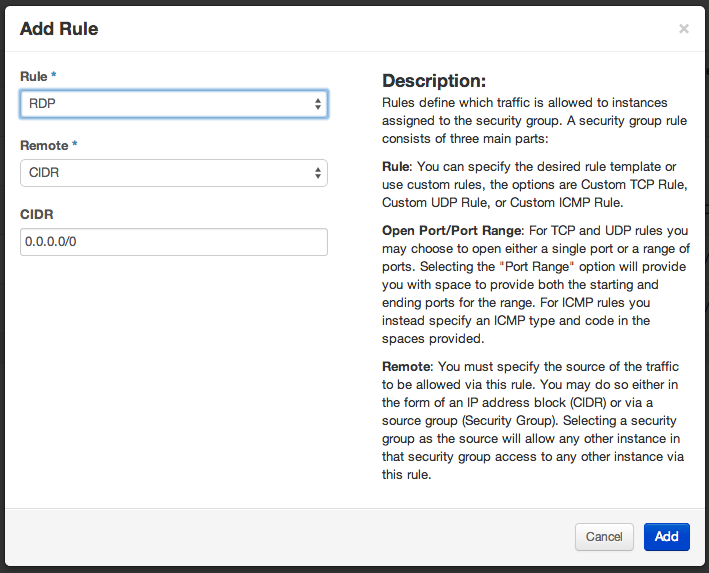
You also might need to set a new rule in the security group of OpenStack to allow a connection with RDP.
Troubleshooting measurements for RDP-connection interruption
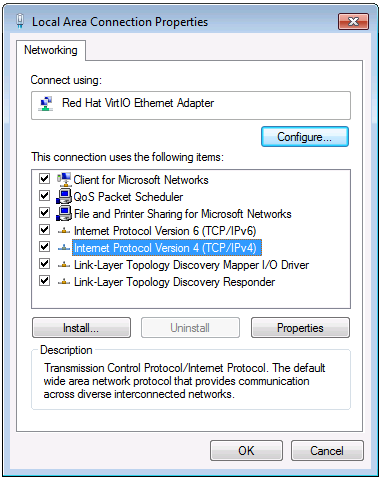
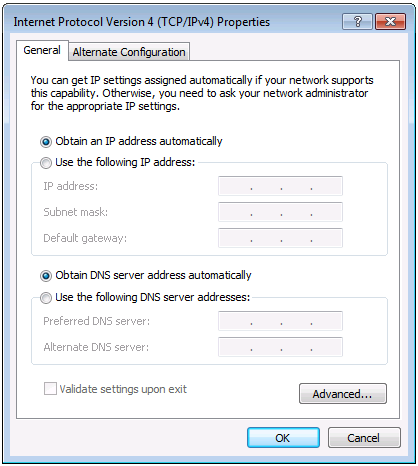
If the connection is lost after a few seconds the problem is probably DHCP. Deactivate DHCP in the Windows settings and use the IP address (e.g. 10.10.x.x.) you got from DHCP as a fix address instead. Do not use the floating IP address. The IP address can be taken from the OpenStack dashboard under “Instances”. In Windows you have to open “Network and Sharing Center” -> “Change adapter settings” -> right click on your network connection -> Properties.
Double click on “Internet Protocol Version 4 (TCP/IPv4)”.
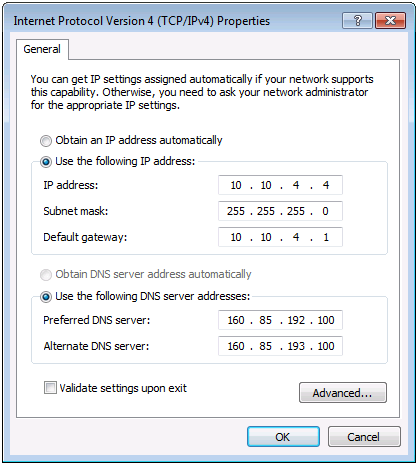
Click on “Use the following IP address”.
Then set the “IP address”, the “Subnet mask” and the “Default gateway”.
It is also necessary to set the DNS addresses.
By following this guide you should now have a Instance of Windows running on OpenStack. Enjoy your new image!
Thanks for this tuto. I’m trying it but you get a type @ “sudo apt-get install gemu-kvm” => qemu not gemu 🙂
Thank you for your feedback! I corrected the tutorial.
Fedor move the virtio-win iso to this page: https://fedoraproject.org/wiki/Windows_Virtio_Drivers
wget https://fedorapeople.org/groups/virt/virtio-win/direct-downloads/stable-virtio/virtio-win.iso
Very nice blog. Thank you
Have you worked with Windows 10? I’ve run into trouble.
Hi Jay,
Unfortunately we didn’t build a Windows 10 image until now. I would try the Win8 virtio drivers for Windows 10.
Have any update? I am still stuck with the windows dvd start up sticking on the splash screen and then erroring out with:
“Your PC ran into a problem and needs to restart. We’ll restart for you.
If you’d like to know more you can search online later for this error:SYSTEM_THREAD_EXCEPTION_NOT_HANDLED”
Any advice?
Hi, thanks for the guide. I can successfully create the windows7 QCOW2 file with size about 8G. However, I can’t launch the image on OpenStack. I tried those two ways to upload, it just said”failed to launch”. I noticed that the image still has 8G, did’t grow after uploading. Does this make an influence?
Estimado tengo una duda, yo logre instalar el devstack correctamente con su red lan correctamente, logre generar el qcow2 de windows7 y logre lanzar la instancia con su respectiva ip generada del pool de ip el cual te lo da openstack, tambien tiene sus reglas respectivas en open stack.
Pero no puedo hacerle ni un ping a esa ip generada para esa instancia de win7 ni mucho menos puedo entrar desde otra pc
Consulta:
antes de generar el qcow2 de win7 odiamente tienes que configurar la ip de la maquina virtual al segmento de mi lan o basta con dejarlo en blanco la configuracion de la ip y desactivar el dhcp
!porque hasta donde entiendo es el opensatck quien te da ls ip y en tu guia veo que tu le ingresas una ip al win7 antes de qenerar tu qcow2 para openstack
Hi,
great guide, and it looks like it works fine for the most part, but I’m having an issue I can’t overcome. When installing Windows 7, after loading the drivers form the VirtIO package and pressing Next, I get the following notice:
“Installing an unsigned 64-bit device driver is not supported and might result in an unstable Windows installation”
I only get an OK button with this error, and when I press that the loaded driver disappears from the list (like it was never loaded). No matter how many times I do that, it’s always the same notice/warning. The result is that I can’t load the VirtIO drivers in order to proceed with the installation.
Any advice on how I can overcome this issue? Try another Windows 7 iso maybe?
thanks,
Alex
Openstack is really a good procedure if you are Windows image for OpenStack then it’s really easy to use and also helpful for you. And it’s gonna be a huge experience for you also. I just want to say well-penned article.